DIY Studioakustik
DIY Studioakustik
„Ein guter Klang ist nicht nur das Ergebnis von gutem Audio Equipment, sondern hängt ebenso von den akustischen Gegebenheiten des Raumes ab.“
Warum die Studioakustik verbessern?
Wichtig. Der Klang im Studio ist mega wichtig. Marc hat sich gerade ein paar neue Studio Monitore gekauft, sie voller Begeisterung ausgepackt und zuhause aufgestellt. Und dann das. Die Boxen klingen komplett anders als im Laden. Von der Präzision kann er nichts mehr wahrnehmen. Alles klingt nach Matsch. Er fragt sich: “Wie soll ich denn so meine Musik Produzieren?”
Marc ist mit diesem Erlebnis nicht alleine.
Denn jeder Raum beeinflusst das Klangbild und verfärbt es – das gehörte Signal klingt also anders als das vom Lautsprecher ausgesandte. Um akustische Signale richtig beurteilen zu können ist dies aber inakzeptabel, weswegen Räume akustisch verbessert werden müssen.
Damit du ein Gespür für Akustik und Schall entwickeln kannst, hilft ein Grundwissen über die physikalischen Gegebenheiten – deswegen zuerst dazu eine kurze Einführung.
Danach verrate ich Dir, wie Du Deinen Raum unter Kontrolle bekommst. Am Schluss gibt es für dich noch eine knackige Checkliste, in der alle wichtigen Punkte zusammengefasst sind.
Ausbreitung von Schall und Reflexionen
Der von den Lautsprechern ausgehende Schall breitet sich zunächst als Direktschall im Raum in alle Richtungen aus und trifft dann auf die Begrenzungsflächen (Wände, Decke, Boden). An diesen schallharten Hindernissen wird er reflektiert und in den Raum zurückgeworfen.
Nach den ersten Reflexionen („Early Reflections“) werden die Reflexionen selbst wiederum reflektiert. Das menschliche Ohr kann die sich immer mehr aufschaukelnden Reflexionen nicht mehr trennen und nimmt sie als diffusen Nachhall war.
Zwischen Direktschall (erster Impuls) & erstem Diffusschallanteil sollten optimalerweise mindestens 15ms liegen.
Bei der Betrachtung der Reflexionen muss in zwei verschiedene Bereiche unterschieden werden: In die Wellentheoretische- und Geometrische Akustik.
„Die Wellentheoretische Akustik gilt dann, wenn die Wellenlängen der Frequenzen vergleichbar oder länger als die Raumabmessungen sind. […] Dann bilden sich in kleinen Räumen stehende Eigenfrequenzen aus – eben die […] Raummoden. Für den Mittel- und Hochtonbereich dagegen gilt die geometrische Akustik. Da die Wellenlängen der Frequenzen kürzer sind als die Raumabmessungen oder Gegenstände darin, wird der Schall auf dem Weg vom Lautsprecher zum Hörplatz geometrisch reflektiert.“ (Kunz 2010). Es gilt: Einfallswinkel = Ausfallwinkel.
Durch die Reflexionen überlagern sich Schallwellen. Durch diese so genannten Interferenzen verändert sich der wahrgenommene Klang, da sich die überlagernden Schalwellen je nach Phasenlage addieren bzw. subtrahieren. Auch die Ortung im Stereobild kann sich verändern. Im schlimmsten Fall kommt es zu Flatterechos: „Ein Flatterecho ist eine periodische Folge von Einzelreflexionen, die aufeinander folgen und dabei immer leiser werden. Es wird meist durch parallele Wände hervorgerufen. Wenn der Abstand der Fläche, zwischen denen der Schall hin und hergeworfen wird, groß genug ist, nimmt man die aufeinander folgenden Wiederholungen als getrennte Signale wahr“ (Kunz 2010).
Durch diese Klangverzerrungen ist ein sauberes Abhören und Abmischen der Musik nicht mehr gegeben. Um dies wieder zu ermöglichen, müssen die Reflektionen entweder durch schräge Wände vom Abhörplatz weg-geleitet oder durch Absorber abgefangen werden.
Absorber
Absorber sind „Objekte, die durch Resonanzen oder Reibungsverluste die Schallwellen schwächen“ (Friesecke 2013: 35). Wie stark die Schallwellen abgeschwächt werden gibt der Absorptionsgrad Alpha an: 0 bedeutet keine Absorption, 1 vollständige Absorption. Grundsätzlich kann Absorption durch folgende drei Techniken erreicht werden:
- Bremsen der Schalwelle in der Schallschnelle durch Breitbandströmungsabsorber. Dies geschieht durch Offenporige Materialien wie zum Beispiel Schaumstoff oder Steinwolle. Hier spielt neben dem Material vor allem der Abstand der Vorderseite zur Wand eine Rolle. Um 100% Absorptionswirkung bei einer bestimmten Frequenz zu haben, muss dieser ¼ der Wellenlänge betragen. Dann Befindet sich der Absorber nämlich genau in Schallschnelle der Welle.
- Auslöschen der Schwallwellen durch Helmholzresonatoren. Hier regt die eintreffende Schallwelle einen Resonanzkörper (Helmholzresonator) an, der einen phasenverdrehten Gegenschall zurückwirft und so die Erregerschallwelle abschwächt.
- Auslöschen der Schallwellen durch Plattenschwinger. Hier regt die eintreffende Schalwelle eine Platte zum Mitschwingen an, was die Erregerschalwelle wiederum abschwächt. Diese Absorber sind zwischen 100Hz bis 400 Hz besonders Wirkungsvoll.
Durch den Einsatz von Absorbern verkürzt sich auch die Nachhallzeit (RT60) eines Raumes. Für einen Abhörraum (Regie) gilt ein Wert von RT60=0,3s über einen möglichst breites Frequenzspektrum als ideal. Allerdings ist das in der Realität kaum zu realisieren. Deswegen wird ein Toleranzbereich angegeben. Gegen die lange Nachhallzeit der Bässe setzt man am besten Basetraps (große Breitbandströmungsabsorber), gegen einzelne dröhnende Frequenzen Helmholzresonatoren ein. Diese Absorber werden in den Raumecken Platziert, da sich hier die Bässe ansammeln. Grundsätzlich lässt sich sagen, dass ein Absorber effektiver wird wenn er an möglichst vielen Raumkanten anschließt, da dort immer ein Druckmaximum liegt.
Neben Absorbern gibt es übrigens auch Diffusoren: Durch ihre unregelmäßige Oberfläche brechen sie die auftreffenden Schallwellen auf und geben sie gestreut in den Raum zurück.
Wie vorgehen?
Als erstes musst du deine Monitore richtig im Raum aufstellen. Danach kannst Du mit Hilfe eines Testtones und/oder mittels einer akustischen Messung beurteilen, wie der Raum behandelt werden soll. Also welche Absorber, Diffusoren und Resonatoren es benötigt. Diese baust Du dann schrittweise ein, bis die Akustik deinen Vorstellungen entspricht. Auf dem Weg dahin kannst Du immer wieder eine Messung durchführen und die weiteren Schritte darauf stützen.
Monitore richtig aufstellen
Hier eine kurze Übersicht zum korrekten Aufstellen Deiner Monitore. Am besten liest du zusätzlich meinen ausführlicheren Post zu dem Thema. In diesem erfährst Du zusätzlich, wie du den richtigen Platz für Deinen Subwoofer findest.
Beim Aufstellen deiner Monitore musst du folgende Regeln beachten:
- Die Abhöre in “Längsrichtung” ausrichten (d.h. du schaust beim Mischen auf die kurze Wand)
- Die Lautsprecher und dein Kopf sollten ein gleichseitiges Dreieck bilden.
- Auf links/rechts Symmetrie achten: Du solltest genau in der Mitte des Raumes sitzen. Nur so ergeben sich gleichmässige Reflektions-Muster.
- In kleineren Räumen empfiehlt sich eine Aufstellung der Abhöre möglichst nahe zur Frontwand. Die Monitore sollten entweder weniger als einen Meter (ohne Subwoofer) oder mehr als 2,2 Meter (mit Subwoofer) von der Wand entfernt sein. Alles dazwischen führt zu einem unruhigen Frequenzgang.
Bei größeren Räumen (>=8m Raumlänge) kann der optimalen Abstand der Lautsprecher zur Wand durch Messung herausgefunden werden: Jeweils Abhöre & Position um 10cm verschieben & Frequenzgang im Bereich 20-300Hz beobachten.
Deinen Raum kenne lernen & beurteilen
Hören
Um einen Eindruck über Deinen Raum zu gewinnen, reichen ein Test-Ton Generator und deine Ohren. Den Testton Generator liefert Dir jede DAW. Bei Ableton versteckt er sich in den Einstellungen.
So gehst du vor: In einer Lautstärke, die ungefähr Deiner normalen Abhörlautstärke entspricht, sweepst du durch die Frequenzen. Du fängst also bei 20 Hertz an und erhöhst die Hertz dann schrittweise.
Du wirst schnell feststellen, dass sich die wahrgenommene Lautstärke immer wieder ändert – obwohl du sie im Testtongenerator nicht verändert hast! Dies liegt an den stehenden Wellen. Wie du schon weisst, schaukeln sich bestimmte Frequenzen in deinem Raum auf, so dass Druck-Maximas und Druck-Täler entstehen.
Drehe beim sweepen durch den Frequenzgang auch immer mal wieder deinen Kopf. Bei einigen Frequenzen wirst du Phasendrehungen wahrnehmen können. Diese können an unterschiedlichen Orten im Raum unterschiedlich stark ausfallen.
Am besten notierst Du Dir, wie Du den Klang bei den unterschiedlichen Frequenzen wahrnimmst. Also zB. durchschnittlich Lautstärke, lauter, leiser, phasengedreht.
Mache danach zusätzlich folgenden Test: Markiere Dir die Mitte Deines Raumes (Zwischen Vorne-Hinten, Rechts-Links, Oben-Unten). Dann stelle Dich dorthin und suche die tiefste Frequenz , bei der Du in der Raummitte nichts mehr hören kannst. Somit hast du die tiefste stehende Welle in deinem Raum gefunden. Sie ist die “Mutter aller Raum-Moden”, da Raummoden ja immer Verhältnis ganzzahliger Vielfacher auftreten (wenn die erste Raummode bei 20 Hertz entsteht, liegt die nächste bei 40 Hertz etc.)
Nach dem Auswerten dieser Ergebnisse weisst du eine Menge mehr über deinen Raum: Wo liegen stehende Wellen? Wo Befinden sich Druck-Maximas und Täler? Bei welcher Frequenz tritt die erste Raum-Mode auf? Wo im Raum nehme ich Phasendrehungen war?
Messen
Neben dem Hören kannst du deinen Raum auch mit einer akustischen Messung analysieren. Ich finde, dass Dir dies deinen Raum gut veranschaulichen kann. Trotzdem ersetzt es den “Hör-Test” nicht.
Um deinen Raum auszumessen benötigst du eine Soundkarte, ein Messmikrofon und die passende Software. Ich habe die Freeware “Room EQ Wizzard” benutzt. Ein Messmikrofon gibt es zum Beispiel günstig bei Thomann.
Wie du die Messung genau durchführst kannst du hier nachlesen.
Als Mac-User musst du noch etwas Tricksen um das Signal Routing im Room Wizzard EQ richtig einstellen zu können. Die Infos dazu sind hier.
Auswertung und Raum-Optimierung
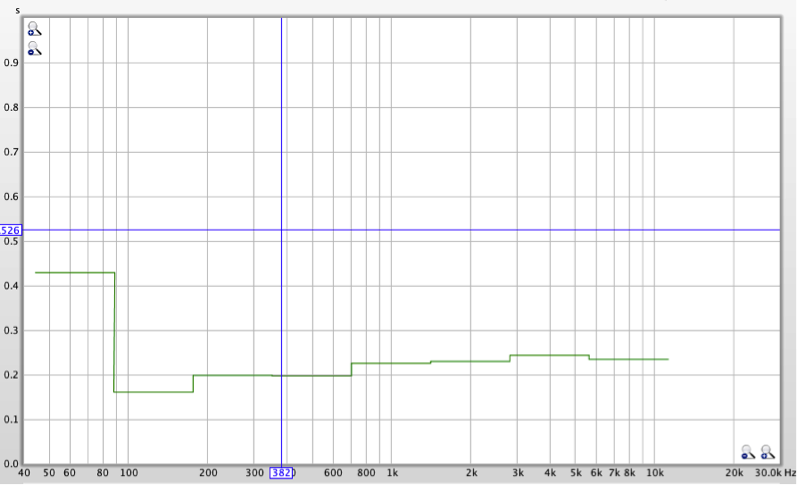
Für den Bassbereich schaust du auf das RT-60 und das Wasserfalldiagramm. Hier als Beispiel das Messergebnis meines nackten Raumes:
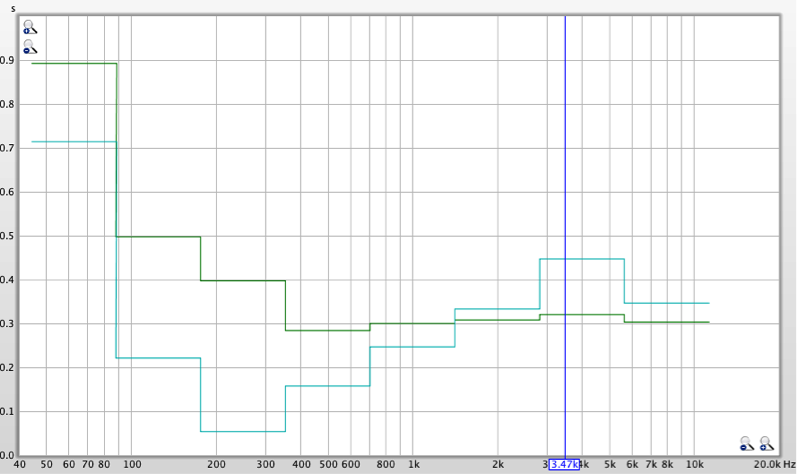
Hier fallen im RT60 Diagramm sofort die mit bis zu 0,9 Sekunden viel zu langen Nachhallzeiten der Bässe und unteren Mitten auf. Erst ab ca. 175 Hz liegen die Nachhallzeiten im Toleranzbereich. In den Mitten und Höhen sind diese schon jetzt akzeptabel. Allerdings sollten sie auch nicht weiter abfallen, da der Raum sonst zu trocken klingen wird. Deswegen sollten keine weiteren Teppiche oder ähnliche stark Höhen schluckende Materialien verlegt werden.
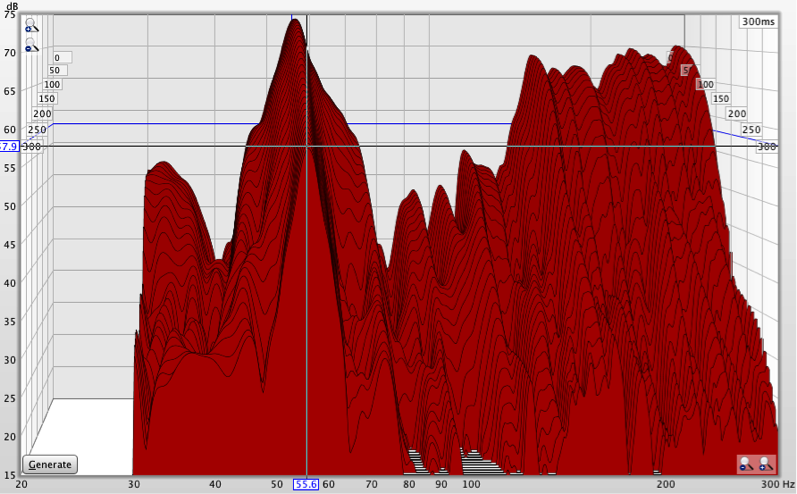
Das Wasserfalldiagramm gibt Aufschluss über die Raummoden und Nachhallzeiten. Man sieht sofort dass alles bis 300 Hz zu lange nachhallt (da das Diagramm vorne fast überall abgeschnitten ist) und auch die starke Mode um ca. 55 Hz ist deutlich zu erkennen.
Raumbehandlung
Bassbereich mit Basetraps
Um die Nachhallzeit in den Bässen in den Griff zu bekommen, werde ich vier Basetraps in die Ecken des Raumes bauen. Diese bestehen aus in Plastiksäcke verpackter Steinwolle und haben eine Tiefe von 60 cm. Die Breite bestimmt wie tief der Absorber wirken wird. Hier einige Breiten und Frequenzen als Anhaltspunkt:
30-50Hz: min 45x60cm
50-70Hz: min 30x60cm
70-90Hz: min 20x60cm
Dies sind die Werte in der Theorie. In der Praxis kann man Basetraps leider nicht unendlich tief bauen, da der Schall nach einigen Zentimetern vom Absorber selbst reflektiert wird. Bis ca. 90 Hertz lässt sich mit den Basetraps allerdings viel erreichen.
Die Absorber sollten in den Ecken platziert werden und bis an die Decke reichen. Denn es gilt: Je mehr Raumkanten ein Absorber berührt umso besser wirkt er.
Auch das Material nimmt darauf einen Einfluss: Es Gibt verschiedene Sorten von Glas und Steinwolle mit unterschiedlichen Strömungswerten. Für Bassfallen ist 6 kPa s/m² ein guter Wert.
In diesem Thread werden verschiedene Dämmstoffe verglichen.
Auf jeden Fall würde ich den Dämmstoff luftdicht einpacken, da er sehr stauben kann und die Partikel schädlich für deine Lungen sind. Ich habe dafür einfach schwarze Müllsäcke genommen, diese aufgeschnitten und mit Gaffa neu verklebt. Die Folie sollte aber auf keinen Fall spannen.
Mitten und Hochtonbereich mit Seiten-, Front-Absorbern und Deckensegeln
Um die Reflexionen von den Seitenwänden zu eliminieren hängst du Breitbandabsorber an die Erst-Reflexions-Punkte. Diese Punkte kannst du auf zwei Wegen herausfinden:
Du setzt dich auf deinen Hörplatz, dein Helfer hält einen kleinen Spiegel an die Wand und bewegt sich langsam an dieser entlang. Sobald du den gegenüberliegenden Monitor im Spiegel sehen kannst hast du den richtigen Punkt gefunden.
Dieselben Absorber hängst du hinter deine Monitore. Der Schall biegt sich nämlich um diese herum – Auch wenn diese kein Bassrohr nach hinten haben.

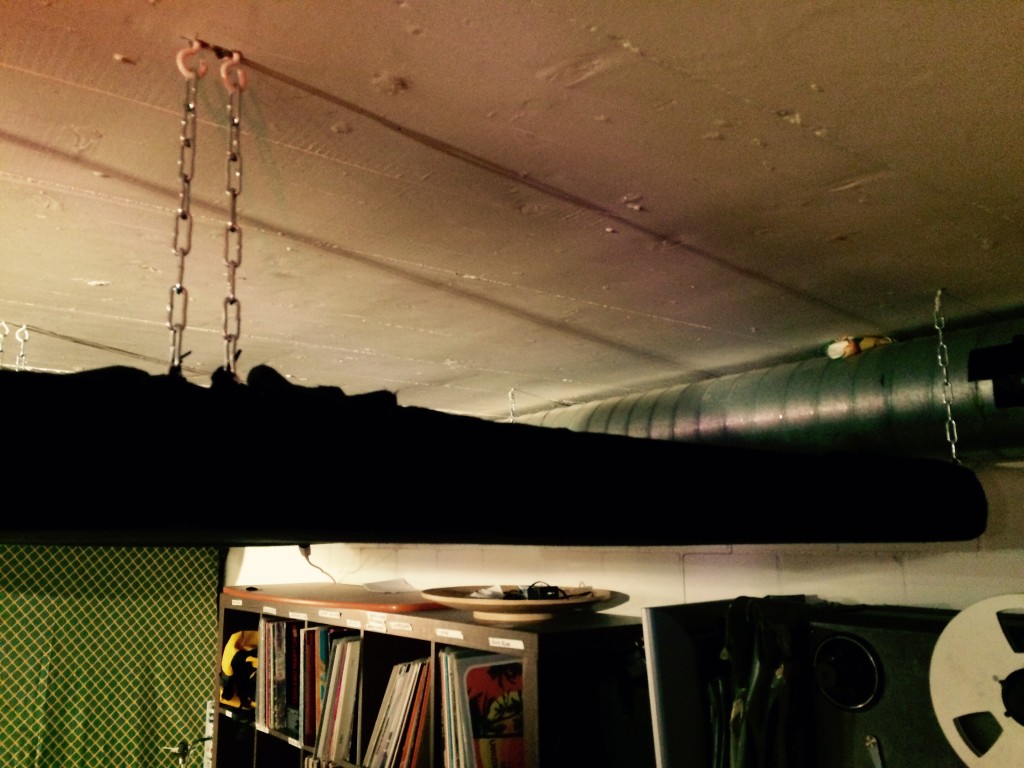
Die Reflexionen von der Decke bekämpft man mit einem Deckensegel. Diese habe ich aus 4 1- Quadratmeter MDF Platten und 10cm BASOTECT-Schaumstoff gebaut: Schaumstoff mit Sprühkleber an der Holzplatte ankleben, das ganze mit Molton bespannen und mit Ketten von der Decke hängen. Hier ist mir ein kleiner Fehler unterlaufen: Hätte ich Löcher in die MDF-Platte gebohrt wären die Absorber noch effektiver geworden. Doch auch so wirken sie hervorragend. Von allen Absorbern habe ich diese klanglich die grösste Veränderung bewirkt. Den Schaumstoff kannst du zum Beispiel bei http://www.schaumstofflager.de/ ordern.
Durch die Eliminierung der First-Reflections verbessert sich übrigens nebenbei auch der Frequenzgang.
Tisch
Wie die meisten habe ich einen relativ grossen Tisch, auf dem mein Monitor und Hardware stehen. Ein grosser Tisch hat aber auch einen grossen Nachteil: Auch die Tischplatte reflektiert den Schall. Das kannst du ganz einfach beheben, in dem du sie mit einem Stück Molton abdeckst. In diesem Video hört man sehr gut wie eine nackte Tischplatte den Klang versaut.
Diffusoren
Um den Nachhall homogener zu gestallten werden Diffusoren verwendet. Diese bringt man zum Beispiel an der Rückwand an. Sehr preisgünstig und effektiv sind zum Beispiel diese hier.
Stehende Wellen
Die Stehenden Wellen, die du mit dem “Hör-Test” aufgespürt hast, eliminierst du am effizientesten mit einem oder auch mehreren Helmholtz Absorbern. Diese genau zu berechnen ist sehr aufwändig und auch mit viel Erfahrung verbunden. Wenn Du deinen Raum damit verbessern willst, rate ich Dir die Beratung durch einen Profi. In meinem Studio konnte ich mit Helmholtz Resonatoren massive Verbesserungen erzielen.

Fazit
Mit verhältnismässig geringem Aufwand und niedrigen Budget kannst du schon viel erreichen. Zum Beispiel sieht die Messung nach der Behandlung bei mir so aus:
Natürlich ist die Studioakustik noch nicht absolut perfekt. Im Bassbereich könnte ich mit mehr Basetraps die Nachhallzeit noch weiter senken. Mit weiteren Helmholzresonatoren-, Plattenschwingern oder einer Raum in Raum Konstruktion kann ich es noch auf die Spitze treiben.
Da das ganze Thema einen erst mal erschlagen kann, habe ich für Dich eine übersichtliche Checkliste erstellt. Du kannst sie hier kostenlos downloaden.
[x_button shape=”square” size=”regular” float=”none” info=”none” info_place=”top” info_trigger=”hover”]Jetzt downloaden[/x_button]

Jetzt interessiert mich natürlich, wie eure Erfahrungen mit der Thematik sind! Schreibt es mir doch unten in die Kommentare.
Quellen:
Friesecke, Andreas: Studio Akustik: Konzepte für besseren Klang
Kunz, Andreas : Wege zu einer Besseren Raumakustik
Klostermann, Felix (2011): Raumakustik Workshop


February 18, 2017 @ 9:37 pm
Vielen vielen Dank für die tolle Zusammenfassung dieses komplexen themas
February 24, 2017 @ 2:24 pm
Sehr gerne 🙂 Freut mich, wenn sie dir weiterhilft.
Grüsse, Georg
March 12, 2018 @ 3:58 pm
Vielen Dank für die Zusammenfassung dieses Themas. Ich kann leider die Monitore nicht an die kürzere Wand anbringen, sondern muss sie an der längeren Wand hinstellen. Zudem ist das ganze eher im Ecken und auf der rechten Seite des rechten Monitors ist ein Fenster. Macht das Akustisch sehr viel aus? Einen Suboover habe ich auch noch. Ist es überhaupt möglich die Akustik mit diesen Gegebenheiten zu optimieren oder sollte man die weiteren Schritte gar nicht verfolgen?
Der Raum hat einen Kugelgarnteppich, Holz Wände und Decke und ist zudem gut gefüllt.
Vielen Dank für dein Feedback!
April 4, 2018 @ 6:27 pm
Hey Christian, so aus der Ferne ist das immer schwierig einzuschätzn. Die Raumoptimierung lohnt allerdings sich immer. Am wichtigsten ist, dass du deinen Raum gut kennst und das kommt durch viel Musik machen und hören 🙂
January 9, 2022 @ 7:03 pm
hello. topic for me thanks kelly
i found this web and i would to help you with evolution. i am from UAE ;D
January 18, 2022 @ 4:17 pm
My husband and i have been so happy that Chris managed to do his analysis with the ideas he had using your web pages. It is now and again perplexing to just continually be releasing key points that some other people may have been selling. And we also take into account we’ve got the blog owner to appreciate because of that. The main illustrations you have made, the straightforward web site menu, the friendships you will help to create – it’s got many awesome, and it’s assisting our son in addition to our family do think that content is enjoyable, which is certainly tremendously serious. Thank you for all!
January 18, 2022 @ 4:18 pm
My husband and i got so satisfied Raymond could conclude his investigations through the entire precious recommendations he made in your weblog. It is now and again perplexing to simply possibly be giving for free helpful hints which usually many people could have been selling. And now we figure out we need you to give thanks to for that. Most of the explanations you have made, the easy web site navigation, the relationships you give support to instill – it’s got all astounding, and it’s really letting our son and us do think this concept is entertaining, which is highly fundamental. Thanks for the whole lot!
January 18, 2022 @ 8:42 pm
heleeast b9c45beda1 https://coub.com/stories/2819791-fuelov_v1-mcaddon
November 16, 2023 @ 10:12 pm
Hallo,
Vielen Dank für den gut verständlichen Artikel. Darf man fragen wie hoch die Decke ihres Raumes ist? Ich muss mit einem Kellerraum mit einer Höhe von nur 2,15 m „fertig „ werden. Da wird es mit einem Deckensegel schon recht schwierig.
MfG Christoph
November 17, 2023 @ 7:06 pm
Hi Cristoph, der Raum war ähnlich hoch – das geht also mit den Deckensegeln 🙂